Friday, 24 June 2016

Resolved | FATAL : Multiple root installs found

While deploying Discover electronics application [CAS based] using deployment template.

You may encounter below error.

FATAL : Multiple root installs found. Only one installer config file may have the update attribute unspecified or set to false.

Solution : You should enter N for the Install base deployment question.

Install base deployment? [Y/N] : N

Tuesday, 14 June 2016

Easily Test ATG REST API using HttpRequester

While implementing ATG REST WebServices, We need to test them. There are number of tools available to achieve this. Recently I have used HttpRequester, its a great tool.

Below are the key features of this tool.
  • Easy to install (Available as addon to firefox).
  • Simple User Interface.
  • Preserves the history of request So that user can review or re-execute the request.
Here I am going to explain login\logout using HttpRequester. Sometimes we need to test functionality for registered user, to validate login flows. Using below steps user can login into application and then perform activities finally logout from system

Step 1 : Obtain the session identifier.
Call /atg/rest/SessionConfirmationActor/getSessionConfirmationNumber actor chain. This will return the session identifier.
Session Confirmation Request


Session Confirmation Response

Step 2 : Pass this session identifier in further requests using _dynSessConf request parameter.

Login Request

Note : For logout call also you need to use the same identifier.


Logout Request

Below is the Request history window. Here double click on any request, pop up will appear to re-execute the request.
HttpRequester Request History Window

Friday, 3 June 2016

Endeca | Expression Record Manipulator

In Endeca record manipulators are used to change the data associated with record during indexing. 
There are 3 types of manipulators available.

1. Perl Manipulators
2. Java Manipulators
3. Record (Expression) Manipulators

Here we will learn how to configure  Record (Expression) Manipulators.

Below are the steps to configure Record (Expression) Manipulators.

1. Open Endeca project in developer studio.
2. Right Click on pipeline editor select New then Record followed by Manipulator.


 3. In Pop up box enter record manipulator name and record source details.


4.  Double click on newly created manipulator. You will see the below expression editor window.


Now create the expressions as per requirement. Below is the example of expression to create new property based on the value of existing property.

Below algorithm used in this example expression.
if value of Dep_ID property is 123
    then create new property named Location with value Delhi
else if value of Dep_ID property is 456
    then create new property named Location with value Bangalore
else
    then create new property named Location with value Pune 

====================================================================
<EXPRESSION LABEL="" NAME="IF" TYPE="VOID" URL="">

  <EXPRESSION LABEL="" NAME="MATH" TYPE="INTEGER" URL="">
    <EXPRNODE NAME="TYPE" VALUE="STRING"/>
    <EXPRNODE NAME="OPERATOR" VALUE="EQUAL"/>
    <EXPRESSION LABEL="" NAME="IDENTITY" TYPE="PROPERTY" URL="">
      <EXPRNODE NAME="PROP_NAME" VALUE="Dep_ID"/>
    </EXPRESSION>
    <EXPRESSION LABEL="" NAME="CONST" TYPE="INTEGER" URL="">
      <EXPRNODE NAME="VALUE" VALUE="123"/>
    </EXPRESSION>
  </EXPRESSION>

  <EXPRESSION LABEL="" NAME="CREATE" TYPE="VOID" URL="">
    <EXPRNODE NAME="PROP_NAME" VALUE="Location"/>
    <EXPRESSION LABEL="" NAME="CONST" TYPE="STRING" URL="">
      <EXPRNODE NAME="VALUE" VALUE="Delhi"/>
    </EXPRESSION>
  </EXPRESSION>

  <EXPRNODE NAME="ELSE_IF" VALUE=""/>

  <EXPRESSION LABEL="" NAME="MATH" TYPE="INTEGER" URL="">
    <EXPRNODE NAME="TYPE" VALUE="STRING"/>
    <EXPRNODE NAME="OPERATOR" VALUE="EQUAL"/>
    <EXPRESSION LABEL="" NAME="IDENTITY" TYPE="PROPERTY" URL="">
      <EXPRNODE NAME="PROP_NAME" VALUE="Dep_ID"/>
    </EXPRESSION>
    <EXPRESSION LABEL="" NAME="CONST" TYPE="INTEGER" URL="">
      <EXPRNODE NAME="VALUE" VALUE="456"/>
    </EXPRESSION>
  </EXPRESSION>

  <EXPRESSION LABEL="" NAME="CREATE" TYPE="VOID" URL="">
    <EXPRNODE NAME="PROP_NAME" VALUE="Location"/>
    <EXPRESSION LABEL="" NAME="CONST" TYPE="STRING" URL="">
      <EXPRNODE NAME="VALUE" VALUE="Bangalore"/>
    </EXPRESSION>
  </EXPRESSION>

  <EXPRNODE NAME="ELSE" VALUE=""/>

  <EXPRESSION LABEL="" NAME="CREATE" TYPE="VOID" URL="">
    <EXPRNODE NAME="PROP_NAME" VALUE="Location"/>
    <EXPRESSION LABEL="" NAME="CONST" TYPE="STRING" URL="">
      <EXPRNODE NAME="VALUE" VALUE="Pune"/>
    </EXPRESSION>
  </EXPRESSION>

</EXPRESSION>

=====================================================================

5. Edit other pipeline component to use this manipulator as record source.


6. Save the Endeca project and run the baseline. Below is the example data indexed using configuration.


Friday, 20 May 2016

ATG - Endeca | Understanding Assembler Architecture

Here I am going to explain how assembler works behind the scenes.

Few key points about assembler.
1. Accepts Content Item in request.
2. Populates and returns response Content Item. 

Assembler
Assembler

In ATG-Endeca Integration Assembler can be invoked using one of the three ways.
1. InvokeAssembler Droplet [When portion of page is rendered using Assembler].
2. AssemblerPipelineServlet pipeline servlet [When complete page is rendered using Assembler].
3. Custom Droplet [Can be used to render complete or partial page using Assembler].

Here I will explain the assembler mechanism from invokeAssemler() method of the AssemblerTools. 
Below diagram explains this architecture.

Assembler Architecture

Explanation :
1. Application Invokes the invokeAssembler() method of AssemblerTools.
2. Invoke Assembler method calls NucleusAssemblerFactory.
3. NucleusAssemblerFactory returns NucleusAssembler instance.
4. AssemblerTools invoke assemble method of NucleusAssembler.
5. NucleusAssembler creates initial version of root and sub content response items. Here it uses the XML     configuration for content along Experience Manager modifications (From Endeca Configuration repository).
6. NucleusAssembler invokes cartridge handlers on root and each sub content items. Cartridge handlers are used to manipulate the content items.
7. NucleusAssembler return the response content item to AssemblerTools.
8. AssemblerTools return the response content item to Application.

Wednesday, 18 May 2016

MDEX | Revert Endeca Index to Particular Baseline

Follow below steps to revert\restore MDEX indexes to previous baseline update.

1. Stop the MDEX Engine.
2. Clean up dgraph_input and sub directories [Delete the content].
3. Copy the previous backup indexes from dgidx_output.<YYYY_MM_DD.HH_MM_SS> to dgraph_input directory.
4. Start the MDEX Engine. MDEX Engine reads the files in dgraph_input and its sub directories.

Here is the example.

1. Old baseline data

Old Indexed Data

2. Latest indexed data

Latest Indexed Data


3. Restore the old indexed data using above steps


Thursday, 10 March 2016

Update Configuration For Already Provisioned Endeca Application

Follow below steps to push/update endeca application configuration changes to the EAC.

1. Navigate to config/script directory of endeca application.
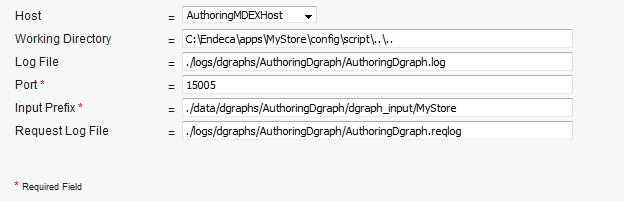
2. Update component definition in respective xml file. For example here we are going to update authoring dgraph port from 15002 to 15005 in AuthoringDgraphCluster.xml.

AuthoringDgraphCluster.xml

Authoring Dgraph [EAC Admin console snapshot].

Authoring Dgraph Before Update

3.  Navigate to control directory of your application.
4.  Execute runcommand script with --update-definition flag. Below is the command output for given example.
=========================================================================
C:\Endeca\apps\MyStore\control>runcommand.bat --update-definition
[03.10.16 23:06:03] INFO: Checking definition from AppConfig.xml against existing EAC provisioning.
[03.10.16 23:06:04] INFO: Updating definitions for dgraphs in restart group 'A'.
[03.10.16 23:06:05] INFO: Updating definition for component 'AuthoringDgraph'.
[03.10.16 23:06:06] INFO: Updating provisioning for component 'DailyReportGenerator'.
[03.10.16 23:06:07] INFO: Updating definition for component 'DailyReportGenerator'.
[03.10.16 23:06:07] INFO: Definition updated.

=========================================================================

5.  Verify your changes.

Authoring Dgraph After Update


Thursday, 28 January 2016

Endeca Logging And Reporting System

Here We will explore the endeca logging and reporting system. Reports are great tool to capture customer behavior on application usage.

Like :
  • Most popular search on application ?
  • Search conversion rate ?
  • How users are browsing the site ?
  • Search and navigation traffic on site ? 
     
Steps to add logging feature in application.

1. Add Logging requests in application code.
2. Modify Report Settings file if required.
3. Configure Log Server and Report Generator.

How it works ?

1. Send Logging Requests to LogServer using Logging API.
2. LogServer write logging requests to log files.
3. Report Generator reads log files and generate reports.

Key Components of logging and Reporting System.


1. Logging API : Used to Create and submit log requests. Below are two core classes of Logging API.
    a. LogEntry : Key/value pair container for log requests.
    b. LogConnection : Used to connect with LogServer.

Log requests are independent of MDEX Engine requests.

2. Log Server : Translate application log requests to flat file.

3. Report Generator : Generates Endeca reports using below three files.

     a. Log File (generated by log server).
     b. Report Settings File. Default Path , %ENDECA_CONF%\etc\ report_settings.xml.
      c. XSLT Stylesheet. -- Setting to specify whether to generate XML or HTML reports. Default Path , %ENDECA_CONF%\etc\tools_report_stylesheet.xsl

Note : In the case settings file path for a report generator is specified in workbench that settings will be effective.


Customizing Report : You can customize reports.  Below are the most common customization.

1. Disable report sections or items.
2. Setting default and list for Top N items drop down.

Here is the report with all the sections and items.


Report after disabling Sorting section and Top Search Key item.


Here is the report with default Top N value (20).


Report after customizing it to 25.


Report Setting file used for above customization.

=======================================================================
<report_settings>
    <top_n report_item="top_search_terms" n="5, 10, 25, 50" initial_value="25" />
    <disable list="sort, top_search_keys" />
</report_settings>
=======================================================================